Trick or treat! Halloween is just around the corner, and if you’re like us, you’ve already begun thinking about your costume for one of America’s favorite holidays. This year, skip the overpriced outfits at the Halloween store and opt for the “do it yourself” option! Here at Pinspiration, we’re animal lovers, so we’ve put together four DIY, animal Halloween masks that are as easy to make as they are adorable!
DIY Felt Wolf Mask
Supplies Needed:
- 3-5 shades of white/grey/black felt
- Stencil (provided by Zü blog)
- Scissors
- Pencil
- Elastic band
- Fabric glue
Instructions:
- Print 4 copies of your stencil (make sure to print them large enough to fit your face!).
- Use each of your 4 copies to cut out a different layer of the mask so you can trace it onto the felt. The first layer will be the head of the wolf, then the ears and whiskers, then the nose and eyebrows, and finally the eyelashes.
- Lay each cutout pattern onto the felt sheets that match their specific shades of grey. Trace around each cutout pattern with a pencil to outline where you will cut.
- Use as a guide, and cut out your felt sheets to match the paper ones.
- Using the fabric glue, stick together the newly cut felt pieces so that they match the stencil. Light grey layer will be the base, followed by the darker grey ear/whisker layer, then the white nose layer, finished up with the black eyelashes and tip of the nose on top of the rest.
- Take a strip of elastic band, and glue each end to either side of the mask. You can also punch holes and tie to each edge for a stronger hold.
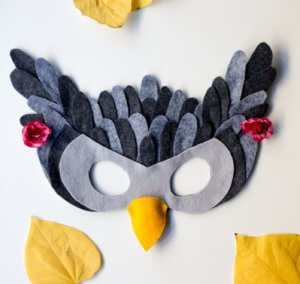
DIY Felt Owl Mask
Supplies Needed:
- Four sheets of light grey/medium grey/dark grey/yellow felt
- Stencil (from Flax and Twine)
- Scissors
- Colored Yarn
- Fabric glue
- Paperboard
- Pencil
Instructions:
- Print your stencil large enough to fit your face. Make sure to print multiple copies so that you have plenty of material to trace on the various pieces of felt and paperboard.
- Use page one of the stencil provided as a pattern for cutting out the paperboard backing of the mask. The rest of the stencils should be used as a pattern for the different layers of felt.
- Cut out the different pieces of your stencil – these represent the owl’s eyes, beak, and multicolored feathers.
- Proceed to glue the outer feathers onto the top of the paperboard. Leave space for the eye cutout to be glued onto the paperboard (it will be partially overlapping onto the feathers).
- Then, glue the eye cutouts on, overlapping onto the feathers.
- Finally, glue on the beak.
- Use a hole puncher to open up spots on both sides of the mask and tie the piece of multicolored yarn firmly into place at a length that matches the wearer’s head.
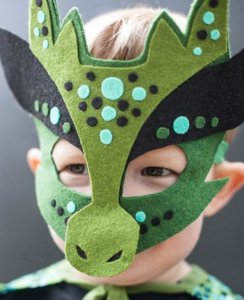
DIY Felt Dragon Mask
Supplies Needed:
- Four sheets of dark green/light green/light blue/black felt
- Stencil (enter your email to download at bottom of post)
- Scissors
- Elastic band
- Fabric glue
- Pencil
Instructions:
- Take a paper printout of the stencil that’s large enough to fit your face, and cut out the various layers of the mask.
- Once you have the different components ready, use a pencil to trace them onto your different felt sheets. The dragon’s snout should be light green, the backing should be dark green, and the eyebrows black. The remaining light blue sheet will be used as an accent color on the mask’s embellishments.
- Starting with the dark green layer on the bottom, glue the black layer on top, near the forehead, and then the light green layer with the snout on top of that. Make sure that the top of the snout layer is lined up about a quarter-inch below the top edge of the backing layer, and that the eyebrows are located high enough on the mask that they do not block the eye holes.
- Cut out various small circles from your remaining pieces of black, dark green, and light blue felt, and use them as embellishments to glue onto your mask.
- With your fabric glue, attach the elastic band to the underside of the mask, just to either side of the eye holes. Make sure this to measure the length of the elastic according to the person that will be wearing it so it is a snug fit. Adults will generally need more elastic than kids.
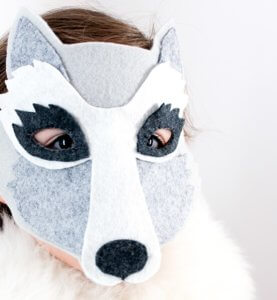
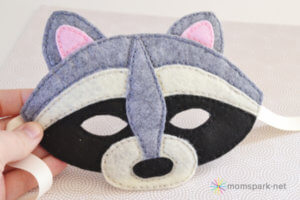
DIY Felt Racoon Mask
Supplies Needed:
- Four sheets of black/beige/pink/light grey felt
- Stencil
- Scissors
- Elastic band
- Fabric glue
- Embroidery Floss
- Embroidery Needle
- Pencil
Instructions:
- Print out a few copies of the stencil on paper, and cut them out with your scissors. It’s important to make sure your stencil is printed out large enough to fit your face.
- Once you have each component ready, go ahead and begin tracing the different parts of the raccoon’s face onto the appropriate felt sheets. For this project, the backing, ear outlines, and center bridge of the face will be in grey. The eyes and tip of the nose will be black. Eyebrows and outline of the nose will be beige, and the inner parts of the ears will be in pink.
- After cutting out rhw felt, Stack the main grey piece on the bottom. This will be the backing for which the rest of the layers will rest on.
- Work from the bottom layer up by next gluing on the pink piece for the ears, and then the black for the face. Follow these up with the beige eyebrow and snout pieces, and then the black for the tip of nose. Finish assembly with the grey piece on the center of the face last, so that it overlaps with the other components below it. This is important not only aesthetically, but also because it adds structural integrity to the mask.
- Once all layers have been glued together, use your embroidery needle and floss to stitch across the seems of the mask to add a little bit of texture and create a stronger bond between the pieces.
- Cut a strip of elastic band large enough for the wearer’s head, and glue it onto the inside of both ends of the mask .
We hope these four simple animal-inspired DIY Halloween masks bring you as much joy making them as they brought us! For more fun projects you can do at home, check out our blog.
In Pinspiration’s Main Studio, you can create your own Halloween masks with ease. With a variety of yarn, embellishments, and all necessary supplies provided, Pinspiration has got you covered for all of your DIY Halloween gear – plus, let us worry about the mess and clean-up! All you need to think about is where you’re going to display it – book an appointment at pinspiration.com